At the start, it could be overwhelming to explore a new product. We wanted to give you some head start to start with the basics and then slowly explore the features at your phase.
Here are 5 basic concepts for you to get started.
1. View your Records
Modules
TradeSchool is split up into several different modules. Each module contains a different set of records and features. The modules include the following:
- Users
- Applications
- Apprentices
- Training
- Sales
- Contractors
- Settings
The modules serve as a helpful way to categorize and partition your records so that they remain organized and easy to navigate and visualize.
Modes
Throughout the software, you will be navigating between the different modes:
- Browse Mode - Records
- Layout Mode - Layouts
- Find Mode - Find Requests
- Preview Mode - Pages
By default, you will usually always be in Browse mode.
Throughout this documentation, we will use these terms as you navigate the software.
2. Navigate through your Records
Toolbar
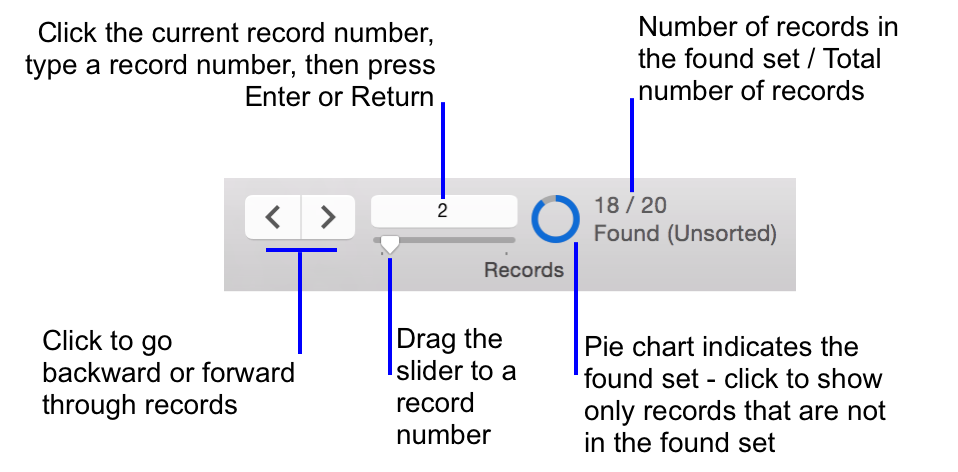
As you add records to each module, you will utilize the navigation controls in the status toolbar.

Found Set
In the module, the record you're currently looking at is the Current Record. Your Found Set is the number of records up in the toolbar, out of the total amount of records. By default, TradeSchool will give you a found set of Active records only.
Views
There are two "Views" for record browsing records in Browse mode:
- Form View will show you detailed view of one record at a time.
- List View will show your Found Set in a list display.
Jump
As you work from module to module, records you view may be related to one another. For example, a Class record in the Training module may contain many Apprentices.
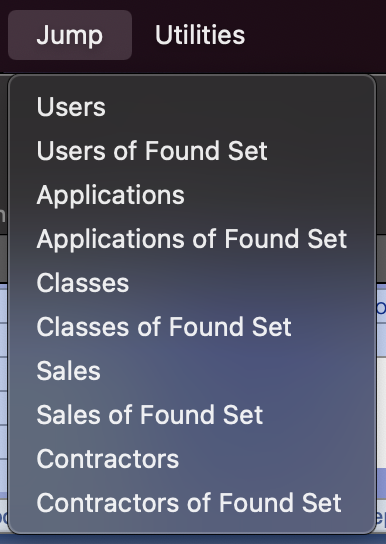
Use the Jump menu to jump from Module to Module. For example, jump from Training to Apprentices, automatically finding just the Apprentices in the class you jumped from.

If you Jump from Classes of Found Set, your found set will then be all the students in your Found Set of classes.
3. Archive Records
As you continue your use of TradeSchool and records grow old, you'll want a way to set them aside so that they don't come up in your everyday searches and actions in the softare.
Archiving records is an easy and harmless way to put a record away and separate them from your active records.
- Check the Archive box to archive a record.
- This will not delete the record.
- You can easily retrieve the record again by searching archived records.
- You can easily unarchive a record just by unchecking the box at any time.
4. Find your Records
By clicking the Find button in your toolbar, your database will go into Find Mode. In Find Mode, all fields are searchable. Enter your criteria into any number of fields, and click Perform Find. This will find all records that match the criteria you entered.
- By entering data into multiple fields, found records will match all of the criteria entered.
- Try searching off of criteria in related records. For example, all apprentices who turned in a January, 2022 work report.
- Click Show All to reset found set to all Active Records.
- Use Constrain Found Set instead of Perform Find to just search within your current found set.
- Click Omit to only find those who do not match the criteria entered.
Keep in mind that by default you are only searching active records. Toggle the Archive box in Find Mode to search Archived records instead, or all records.
5. Data Normalization
Database normalization is the process of structuring a relational database in accordance with a series of so-called normal forms in order to reduce data redundancy and improve data integrity.
What Does This Mean?
In TradeSchool, we aim to reduce redundancy. To achieve this, we have introduced the Users Module. The Users module should contain a unique record for each person that has ever been tracked in your system.
This is why everytime you add a new person to the database, it pulls up the User Picker. While you fill out the form to add a new person (application, apprentice, etc), it will automatically filter for matching Users below so that you can be sure you're not adding a duplicate User.
The User Record ties together all of a person's related records, and provides a place in the software to quickly retrieve a person's entire history.
- View someone's history in the Users Module under the History tab.
- A User Record is also synonymous with an Account on the Web Services. Their Main Email is their Username.
- If more than one User has the same Main Email, they will not be able to Login on the Web Services.
Only add a User record if they do not already exist.


